Showing posts with label food. Show all posts

Saturday, January 3, 2015

Pantry Organization for FREE

Yup, you read that title correctly!


I did not pay anything to get one of the shelves in my pantry organized. But it absolutely had to happen. At least, I had to get the process started.

Granted, it doesn't all look beautiful, but it's good enough for now! I was just using what I had on hand to make my life easier - AKA, not struggling with my 12 Winco Large bags from the bulk foods section!

Yeah, I can't even make this up. It was bad!
 Here are some essential tools I used for this process:

Canning funnel, label maker
You do not have to have either one of these items for pantry organization! It sure makes life easier, though. And I can't remember what I did without my label maker. But I digress....

Anyway, I pretty much just eye-balled everything I had to work with. I knew I had a bunch of odd-sized jars in the garage that I would eventually like to re-purpose for things like tealight holders and various other things, but for now, they served a greater purpose - holding the random contents of my pantry. I pulled all that stuff together in the kitchen as I needed it, and it seemed to work just fine for me. Others might have preferred to bring it all inside at once and set it all out. I also had our black canisters that we got for our wedding that were needing to be cleaned out and re-used for other foods, and that helped tremendously.

Essentially, I would look at a bag of whatever I had - flour, powdered sugar (seriously, who needs 3 random bags of that stuff?!), chocolate chips, cocoa mix, etc. - and then tried to estimate how much space I'd need in a container for it.

Victory #1! Powdered Sugar in a
re-purposed baby oatmeal
container!

Next, I tried to be logical about the type of container I was using. If I had a container with a pour spout, I'd put something finely ground in there if I could. If not, I tried to put things that come in small sizes in (like oats). Some items didn't require labels at all!

See that? I didn't even care to waste
a label on it! A Sharpie worked
just fine!

I may have committed chocolate blasphemy here:
I combined the 1/2 bag of Winco brand chocolate
drink mix (leftover from Christmas gifts) and the
1/2 container of Nesquik.
Again, I didn't have to label
everything. These are oats. Duh.

Yes, I had to resort to one plastic baggie, sigh!
But at least the chocolate chips are sorted, and
easy to measure/ pour!

Next, I started labeling stuff!


I ended up with something that looks like this
I haven't decided yet where everything is going in the pantry. But it's a lot better than it was before! And I eliminated 14 bags! If I can do it, ANYONE can!

So, to summarize, this is what I did:

1) Bring out contents of pantry to be organized
2) Decide which containers will be filled with various items
* Optional - measure by pouring into measuring cups before deciding on containers. 
3) Start filling things up! (Don't be discouraged if you have to pour out and re-pour. Keep a couple bags on hand for this. Ziploc gallon-sized works great, or your bulk bags will work, unless you're using a product like sugar, which takes on the flavor properties of anything it's exposed to). 
4) Label everything. A Sharpie, white paper and tape will work just fine. You could also get super fancy and print labels from your computer, laminate them, cut them out, and hang them off your containers with baker's twine.
5) Decide how you'll organize your pantry with your newly sorted and combined foods!

One thing I will note: I did this at a time that I wasn't cooking or baking, and therefore already frustrated by not being able to find anything.

My next steps of this project will be using my small canning jars for items such as my bulk spices, baking soda and baking powder (took a page from Ree Drummond's book for that one!)

Tuesday, January 21, 2014

Christmas Gifts 2013

For Christmas this year, we (primarily) made all of our gifts.

We did buy just a few, because we felt that they were needed or nice additions to our homemade gifts. This does not mean that we are abandoning our tradition of making everything. We still firmly believe that our gifts from the heart are a great blessing to others, and will continue to make our gifts as usual. There were just a couple of things that we thought were a good idea to purchase (more on that at the end).

Without further ado, here are the gifts we made this year!

Well.... actually, to start with - some gifts I made for Angie. Robert's aunt got married on January 11th, and for one of her showers, I made her something unique to take on her way: tea towels that are hand-stamped with carrot sticks and celery.

I used a Julienne-cut carrot stick for the gray-printed towels
(it was a little messy to stamp).  For the green, I used a celery stalk end. Both were
stamped with Ceramcoat paint. (FYI - I learned that this is the medium used to make
acrylic paint fabric paint!)

Here are both towels together

Another shot of both towels

And finally....Christmas gifts!

I'll start with Ashley and Leah's. I was most excited to give these gifts of any this year! I spent a lot of time making them, and I'm super proud of how they turned out!


Custom horsey coffee sleeves! (I kind of made
my own pattern from a Starbucks sleeve).

I used plain brown fabric for
backing, and this gorgeous horsey
fabric for the front. I had the buttons
already. I wish I'd had tension bands
to secure them instead, though! I wanted
them to look like little lassos originally.

My OCD did kick in, and I did a different cut on the
fabric pattern for each, so different parts of it showed. I also put the button openings on separate
sides (on left, one right), because Ashley is right-handed, and Leah is left-handed. :)

They were super fun to make - but more fun to give!
The green scarfette! This one is Ashley's.

The cream scarfette! This one is Leah's.
Both scarfettes together. I really wanted Paul to
make me those gorgeous wooden buttons, but
alas, I learned that he needs a special tool (a lathe),
to be able to do it. Sigh. I don't have the money for
that kind of tool! So I bought them new. I think they
still look awesome!


A blanket I made for my brother, Tristan. He
is always cold! This is a big (queen-size) fleece
blanket that I blanket-stitched around completely.

I thought the colors would go with anything he has,
and he could probably use it for a top blanket, or even
a quilt.

Happy Juice. We gave this to cousins, since they
all love it so much! Shane calls it, "Happy Juice,"
or, "Kimi Juice." So sweet! :)
Lemon-Rosemary Marmalade

As you can see, I went all out with the decorations,
using a sprig of rosemary, baker's twine, a custom
label, and festive fabric. :)


We gave this to various family members, and we
had a little leftover, and saved it for ourselves. It is
SO GOOD! But it took the better part of 4-6 hours
to create. We may never make it again, lol.
Pomegranate Syrup! This was
for Dad C & Perry.

Robert found the super cute glass containers at
Fred Meyer on clearance. Score!
Here's one of the last gifts - we didn't make it. But,
we did buy local! This came from Karen's Flower Shop, and it was for my mom!

Another gift for my mom!

These actually weren't displayed together in the
store, but I really wanted them both. I thought they
were a perfect addition for my mom's kitchen!


The other gift we bought was a nice new jacket for my dad from Columbia Sportwear. It is light enough to wear comfortably, but has that special omni-heat technology and all these other little gadgets on it. He loved it!

If you're wondering where I got the ideas for our gifts this year, it was Food Gifts again. I really think that the $10 or so we spent on the magazine was well-worth it. There are a lot of other ideas that I still want to make!

The towels for Angie even came from that! (Although they don't look nearly as neat as the towels in the magazine).

Anyway, I hope you enjoyed my post on gifts in 2013! 

In case anyone is wondering how I am able to post this at 1:00 in the afternoon when I should be at work (which I am), Blogger has this amazing "Schedule posts" feature that I now use occasionally when I'm behind on blogging. Okay, I use it a lot right now, because I need to get caught up! I compose two blogs in one evening, post the first, and delay the second until the next day.

Sunday, January 6, 2013

Victory Doughnuts - Homemade Baked Maple Bars

Today, Bryce and Daniel came over to watch the Seahawks game with us. :)

Although I am very, very tired today, I decided to try one of the recipes I pinned on Pinterest awhile ago.


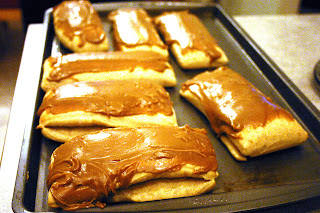
Homemade (baked) Maple Bars!

They turned out fabulous. :)

I used this recipe, but I'm posting what I actually did here on my blog, since I changed it a little bit:


Maple Bars
1 1/2 cups milk
1/3 cup shortening   butter
4 Tablespoons granulated sugar
2 teaspoons salt
1/4 cup lukewarm water
4 1/2 tsp. yeast
2 large eggs, beaten
5 cups flour
2 1/2 tsp. cinnamon
1/2 tsp. nutmeg


Maple Icing
1/3 cup butter
1 cup packed brown sugar (make sure there are no molasses chunks - they will not cook down)
1/4 cup milk
1 1/2 cups powdered sugar

2 teaspoons mapleine
1/8 teaspoon salt

For the dough:
  • In a medium saucepan scald milk; add butter, 3 Tablespoons granulated sugar, and salt. Stir to combine and set aside to cool to lukewarm. (I didn't quite let it cool until it was lukewarm; but it didn't seem to matter)
  •  In a large mixer bowl, add the lukewarm water and the yeast (remember the water should be just lukewarm, too hot and it will kill the yeast)
  • Add the remaining 1 Tablespoon of sugar to the yeast and water and whisk to combine. Let sit for about 5 minutes until it starts to bubble and become foamy. 
  • After the yeast is foamy and the milk mixture is lukewarm, add the eggs to the yeast and stir to combine, then add the milk mixture to the yeast mixture. 
  • Whisk the cinnamon and nutmeg into the flour and gradually add to the yeast mixture. You may need to add more, you want the dough slightly sticky but not too sticky.  
  • Knead for 3 to 5 minutes. (Mine got too thick and heavy to whisk; so I probably kneaded for a good 10 minutes as I mixed in the last of the cinnamon/ nutmeg flour mixture)
  • Spray another large bowl with non-stick spray, place dough in the bowl and let raise for an hour or until double in size. (I let mine go for exactly one hour).

  • Punch down and roll out into a large rectangle about 1 inch thick. Cut the rectangle in half, and then each half into 6 pieces to make 12 bars, then place on a greased baking sheet. (I split mine onto two baking sheets).
  • Let raise for about 30 minutes. 
  • While bars are raising,  preheat the oven to 425 degrees.
  • Bake the bars for 7 to 8 minutes or until light golden brown, Watch carefully. Remove from oven and let cool slightly before icing. (I didn't let mine cool for longer than 10 minutes, because the icing probably won't spread well if they're too cool).
Make the icing while the bars are raising:
  • In a small saucepan mix butter, brown sugar and milk. (I used a spatula for stirring).
  • Bring to boil for medium heat and simmer 3 minutes.
  • Remove from heat and cool for 15 minutes. 
  • Add the mapleine and powdered sugar and blend well with a hand mixer. (I mixed it first with the spatula, so that powdered sugar didn't go all over my kitchen). 
  • Add a little more powdered sugar if needed (I didn't add any extra).
  • Spread on the cooled bars
Thumbs up for "Victory Doughnuts!"
 
 The boys all approved, calling them "Victory Doughnuts."  
 
The only advice I really have about this particular recipe is to be patient - the dough takes awhile - and make sure you're always watching what you're doing. I didn't mess up, but I easily could have. It helped to have all the ingredients measured out before I started, too.

I love trying out Pinterest recipes! :)