Sunday, December 29, 2013

Christmas 2013 - part 1

Elizabeth's First Christmas....

was exhausting for her parents, lol!

I'm going to have to do this post in different parts, because we have hundreds of pictures. I'm still editing and sorting! But read on to see what we did on Christmas Eve! 

Since Robert had to work on Christmas Eve, Mommy & Ellie did a mini photo session that morning
 :) 

My favorite!


"All done!"

Clapping hands

"So big!"

Slapping hands on legs like at KinderMusik :)

Looking out the window


"I'm gonna eat this sleeve, Mom..."


So after our little photo session, Elizabeth took a nap. I think I took one, too, if I remember correctly. I'm also fairly certain that she nursed about 7 or 8 times on Christmas Eve! (Pretty sure that was just a "I'm-so-happy-my-mommy-is-home-with-me" thing, because she's cutting out nursing quite a bit these days on her own, since she likes her homemade baby food so much!) Then, we went to pick up Great-Grandma Crombie!

Here's Great-Grandma giving
Elizabeth some juice!

Elizabeth wasn't very impressed with the juice. I
ended up having to nurse her - again - about 4 minutes
after this picture was taken.

Robert and his grandma

I love this picture of them!
Robert had to take Grandma Crombie home earlier than we wanted to have her leave, because she was preparing Lefse for the gathering at Aunt Jane's later that evening. (We missed out on that one this year).

Elizabeth took a nap while Robert took Grandma home, and we gathered all the presents together in groups, based on where they were going and when. (Yeah, we were all over the place!) By the time she woke up, we were running behind. But I wanted to let her sleep as long as she possibly could, since I knew it would be a very long 24-48 hours for her. We loaded up and headed to Grandpa & Grandma Byers' house. It was a small gathering this year - just 10 of us: Angie, Laurie, Grandpa & Grandma, Robert, me, Elizabeth, Robert's parents and sister.

The princess was quite happy in the middle of the
floor in her fancy dress that Great-Grandma Byers
got for her!

She loved feeling it and flipping it up and down,
and spreading it out!

I LOVE this picture! Wonderment, innocence, and
baby face - all together in one adorable Christmas
Ellie package!

Elizabeth helping mommy open her gift from
Grandpa - new mats for my kitchen!

She enjoyed eating the ribbon, paper and tissue
paper. We did not. We had to dig quite a bit
out of her mouth when she sneaked some without
us looking - and of course it had to be red!

Opening her gifts from Great-Grandpa & Grandma
Byers!

She was saying, "Oooooooh!"

Center of attention!

"What's in here, mommy?"

She loves her new big, overstuffed doggie! (But he
is not Sargee - she really misses Sargee, and he
misses her! I'm trying to get her up to my parents'
house more often so she can visit him, too!)

She wanted to be in the box. :)
Best Christmas gift ever!

I drew Angie's name this year. Since she will soon
be moving to Ecaudor, I wanted to give her something
useful and small. She unwrapped a few small samples
of fabric, as I will be making her a Bible cover with her
fabric of choice!

All wrapped up in ribbons!

She loved this!

Giggling at herself!

Daddy opening his gifts

She kinda toppled over. We all clapped for her, but
she squealed.

In another box

More juice (with Grandpa)

I think this one looks like Ashley!

Spending time with Grandpa

I think it's safe to say Grandma loved her gift from
us! (Better pics of what we did for the grandparents
and great-grandparents in another post). It says, "Ellie
Jo's Mistle{toes}." Thanks, Pinterest!

Number one Auntie is the favorite

Smiley, happy girl!

Auntie Laurie opening a beautiful new vest

We had carolers! (AKA, Hank & Mary!)

"Let's clap hello to Ellie...." This soon got old.
But it kept her entertained temporarily!

Thursday, December 26, 2013

7 Months Old

Here it is - late again! :)

Elizabeth Johannah is now 7 months old!

She has found her voice, lol. She's not so much into screaming anymore, but definitely likes to be heard! Most of the time, she likes to be with us (or whomever is around her). Ellie does not like to be left alone (hmm, like mother, like daughter?!), because she likes to be a part of everything and see everyone. She sometimes has a hard time going down for naps/ bedtime because she wants to be a big girl and stay up!

Most of the time, our schedule is something like this:
8-9:30am Wake up, change diaper
9:35-10:00am Eat oatmeal & fruit, sometimes have juice
10:45-11:30 Play time/ Nurse
11:30-3:00 Nap
3:00-3:10pm Wake up, change diaper, change clothes (if needed)
3:15-3:45pm Nurse and/ or eat lunch (usually a fruit & a veggie)
4:00-5:30pm Play time
5:45-7:00pm Nap
7:15pm-7:30pm Wake up, change diaper
7:30pm - Eat dinner
7:45-8:00pm - Play time/ Nurse
9:00pm - Bed time

Ellie doesn't usually have a lot of play time these days, because she's going through another growth spurt, and prefers to sleep and eat most of her time during the day. Also, she still has no teeth. Her little gums are hard, and she definitely inspects everything in her mouth! But no teeth yet.

She prefers her vegetables to be sauteed lightly in macademia nut oil or olive oil. No joke. She will not eat the veggies that we painstakingly steemed, peeled and blended in her Baby Bullet!

But check out all the food we made for her a couple weeks ago with the Baby Bullet!
We made 40 containers of baby food! And...she hates half of it, lol. Next time, we'll saute and then blend. Sigh.

Anyway, here is the adorable Elizabeth Johannah at 7 months old! (Er, 7 months and 12 days old - I was super late on the pictures, because we lost her "Month" stickers!)

Typical.

I said, "Smile baby!"

Daddy tickles baby :)

Fingers in mouth. Always.

"Don't touch my feet, guys!"

This drives me crazy! She does these wacky stretches
and bends her legs all weird! (Shudder)

Another typical pose. Winking,
finger in mouth, slouched down in
her seat!

Saturday, December 21, 2013

A First For Elizabeth

Today was a first in our house!! (I'm sure my daughter will someday roll her eyes and beg me to take these pictures off the blog, lol!) 
Elizabeth went potty in the potty! BOTH #1 and #2!! 

Daddy and Mommy heard her grunting, so Daddy rushed her in to the potty, and sure enough, she went! 

We had sat her on the potty a few times previously, but she never did anything. We were just wanting to get her used to the idea. 


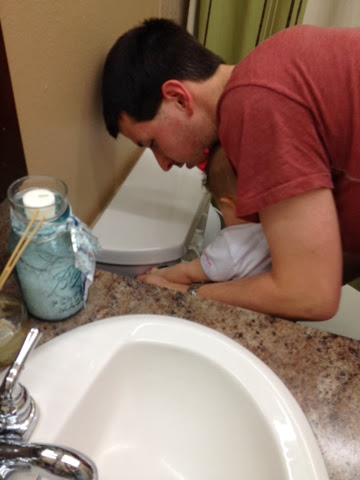
Here she is flushing the potty with Daddy like a big girl! 


Daddy let her wash her hands (aka swish them around in the water while), and helped her dry them on the towel! 

Potty training isn't "full-speed ahead," but we like the idea of her getting used to it so she isn't afraid or embarrassed when she's done with diapers. We started at 6 months old, and we will now put her on the potty 1-3 times a day. 

This isn't for everyone. But it's what people do in other countries, and it seems to work just fine. So we're trying it out! 

Yay Elizabeth! 

Thursday, December 12, 2013

DIY Headband Holder


Sometimes, I find myself saving random materials so that I can make useful products out of them later. It's rarely literal re-purposing, but tonight, I think I achieved it.

I've had this plan for the longest time - over a year, in fact - to make Elizabeth a headband holder out of a container, glue, and fabric. I had saved an old White Chocolate container from the espresso bar at church after one of my shifts with my sister-in-law about 3 months ago. Tonight, I finally brought this project to fruition.

To do this project, you will need the following:


  • Round container with a lid (the circumference of mine was roughly 16", and it was about 6.5" high)
  • 2 different fabrics, preferably one solid and one pattern
  • Hot glue or Fabric Glue (or, in my case, Mod Podge, because our house is still full of random boxes, Christmas totes and toys, and I can't find my glue gun - we just moved in less than a month ago)
  • Measuring tape
  • Iron & ironing board
  • Fabric scissors
  • Ballpoint pen
Once you've gathered your materials, you can get started!


Measure the circumference of the container before you start. This will help give you a basis of how much fabric you need.


 Cut your fabric. In my case, since my circumference was about 16", I made sure I cut 17" long, so I could have clean edges that were folded over in the end. My trim pieces are the solids, and the main piece is the patterned one. The trim pieces were cut about 1.5" wide each, so I could fold over the edges and iron them down. The main piece was about 6" wide, so that I could fold over 1/2" on each side for clean edges.


Next, iron your fabric down. (I took my measuring tape with me so I could measure the width at both ends, and once in the middle as I went!) It helps to lay it out flat as it will look on the container, so that you get a good visual for any flaws in your ironed edges.


It's time to start gluing! If you're using Mod Podge, make sure you cover enough space with a straight line. You want about 1/2" width, so your fabric doesn't pull away as you turn and glue. If you're using hot glue, remember to have your fabric ready, and glue quickly, so that your glue doesn't dry before you get your fabric set!


Glue down the top border first. Use glue all the way around, turning the container as you apply glue and press down the fabric. Make sure your fabric lays straight, and flush against the container. For the clean finished edge, just fold over and glue down.


Glue your bottom border down. Again, make sure you get glue all the way around so you don't get fabric puckering.


When you're done, you should have the open edges pointing towards each other, and the ironed edges on the outside. (Yes, I fixed the little fabric pucker at the bottom of the container!)

Glue the main fabric down on top of the trim pieces. Ideally, you want about 1/2" of overlap, to fully hide the open edges of the trim pieces, and secure the main part down. Again, make sure you use glue all the way around.


To finish the gluing part of the project, just fold down the last open edge of the main fabric and glue down. Again, a good rule of thumb is about 1/2".


Now you're ready to trace your circle for the top of the container! It's a lot easier to get a clearer circle if your container is still attached to the lid.

Trace & cut out the circle. (It works best if you cut just on the inside of the line, so you don't have to trim off the edges).


Glue down your fabric on your lid, and you're done! I used the solid instead of the print on mine, but you could use either the pattern or the solid. You can also use a second accent color.


Ta-da! Here's the finished product with some headbands on it!


Looks pretty nice, right?


Of course, if you're my daughter, you have 20 headbands, need about 4 of these containers, lol!

Enjoy!