Wednesday, May 30, 2012

The Not-So-Secret Garden

1 Corinthians 3:7 "So then neither he who plants is anything, nor he who waters, but God who gives the increase." (NKJV)

Well, I have a little update on my little garden!

Back in April, I planted a garden. We did not decide to do a raised-bed garden this year after all for a few reasons, but I am so thankful for that decision!

I am not sure we would have been prepared to care for a garden such as that this year because we're not around on a consistent basis (both of our schedules are different every single day), and though we spend plenty of time here at home, the hours we're here are never identical from day-to-day - which makes tending to a needy space difficult.

However, I will say that we are so blessed this year by my attempt at a little garden in pots and planter boxes!

I really like doing it this way because:

  • It hardly takes up any space, and we can still entertain on our deck.
  • Everything seems to grow quite well along the sides of the deck with little difficulty.
  • It's low-maintenance compared to other gardens I've seen.
  • Everything is visible through the screen doors, so when I'm in the family room (which I am every day), I can tell when watering is necessary, if I need to pick off some dead leaves or trim something back, etc. 
  • I get to share this special little garden with everyone who comes to visit us quickly and easily!


The chocolate mint I planted for Robert is doing so well!

A pea pod!

Another pea pod! I got 7 or 8 that I took to softball with me as a snack last night. Yummy!

Adorable little pea pod flower!

Did you know pea plants tie knots around shallots/ chives all on their own?  So cute!

Look how high the pea plant is climbing the deck! (Don't worry; it's not tangled!) And note the pea pods I got to pull and eat sitting on top of the deck!

My shallots. :)

Spiderweb on the other side of the deck - before I destroyed it, lol.

Strawberry plants - just starting to bloom a bit!

Can you see the tiny strawberry starting to grow?

Strawberry flower!!

Cilantro and Early Girl tomatoes growing like crazy!


I haven't posted a picture of my lemon balm yet, as it actually looks worse than it did when I planted it (sigh). It's a partial-shade plant, from what I understand. So, it did not like the recent rainstorms and 8 days straight of sun. Is it too much to ask for a little consistency?! 

Anyway, if you'd like to see where my garden got it's start this year, please look at this previous blog post.

If you have a garden this year, how's it doing? I'd love to know!! If you have any questions about mine, feel free to leave a comment and ask! :)

I saw this and I think I'd really like to have something like it for my strawberries someday!

Saturday, May 26, 2012

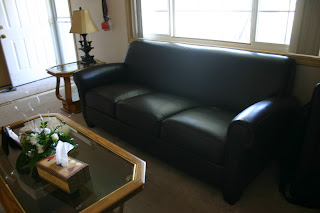
Better pictures of our new couch :)

 Because some of my friends were begging me to use my "real" camera (i.e., my Canon Digital Rebel EOS as opposed to my iPhone, hehe), I decide to take a few pictures of our new couch in the beautiful sunlight of the mid-afternoon. :)

This first one is from me standing about 4 feet out from the piano, looking towards the front door.
 This second picture is kind of dark, but I was lazy with the shutter speed, lol. Standing in the entrance of the dining room looking straight out towards the front of the house.
 This next picture is probably the best one. Looking towards the south from the entryway.
 Another view of the couch (I thought this would show the "espresso" shade, but alas - no. It just looks black).
And finally, the last one.

I know these pictures don't show all the imperfections of the couch, which allowed me to purchase it for a screaming deal. (See my post on that deal here). But I thought I'd post some "real" pictures of it anyway.

Enjoy! :)

Wednesday, May 23, 2012

Great deal!

So, just to see how I'm doing, I pulled up my goals post last night.

I am about halfway on everything (as far as getting things done).

But we did get one HUGE goal accomplished - it was not posted for May goals, as I didn't know when we'd be able to do it.

Here it is:

We got a brand new couch!

Robert has been admiring it at Fred Meyer while Ashley and I went to Wyoming to pick up Olivia from school. He pointed it out when we went grocery shopping after I got back home. The price was a bit steep for my liking - $389.99. Even though it was 50% off of the sticker price (about $600), which was already marked down from $1000.00ish.

So, we asked if it was the last one left, and were told (after some checking) that no, they had another in the back. Sigh. We knew they wouldn't sell it until it was the last one. The important thing to note is that we wanted to purchase the floor model.

Three times since that day we went back to Fred Meyer, asking each time if it was the last one. Finally, we got someone who told us to talk to the manager of that department the next day when she was in. At that time, the couch was marked down again to $319.99.

Since Robert was working that day, I went in myself on my way home from work. I located the manager, and offered to get the couch out of there that day if she would give it to me for a discounted rate. We negotiated on that for a bit, but because she's the manager, she could make the final decision on taking that particular couch (floor model) out. (And I knew that).

She told me she'd sell it for $100, as it had a 50% off clearance price on the tag. She then retracted that statement, saying that she didn't realize that discount had already been applied (darn!), but said if I could get it out today, she'd definitely sell it to me for $150 + tax.

I made my husband a very happy man when I texted him to say that I talked her down to the price I did, and that it was coming home that day. :)

So what does that mean for our old couch?

Well, it was technically my grandparents' couch, and is 10 years old. It is currently on Craigslist, and will be sold in our garage sale in a couple of weeks if it doesn't sell online. We're also considering selling the coffee table and end table in the living room and replacing it with my 3-legged round table by the china cabinet, and the silver/ glass coffee table I have in the rafters of the garage, instead of just selling that silver/glass coffee table in the garage sale. But we'll see.  

Yay for great finds and deals!

Saturday, May 19, 2012

Haircut!

Got my hair cut this morning! 6 inches - gone! So happy. :)

Friday, May 18, 2012

DIY - How to replace a burnt out turn signal lightbulb

A few months back, Robert and I were in the Focus (he was driving), and he put on the left turn signal. It was clicking very rapidly. I asked him what was wrong with it, and he said he didn't know, but that it had just started to do that on his way home.

I did some quick checking, and sure enough, we had a burnt out turn signal in the back.

I went to O'Reilly's, and bought a set of 2 bulbs (I think it cost me about $3). Robert was unavailable to help me with this project, so I did it myself.

When I got back, it didn't take me long to figure out how to replace the burnt out bulb, but I had to do this again today with the other side, and decided to post how I did it. :)

 This is what the back of my 2006 Ford Focus ZX4 looks like. (And this is the side which had the burnt out turn signal).

When the bulb is burnt out (or has some other problem, such as connectivity), it will do one of two things: blink rapidly in the front or rear - whichever is not burnt out - or stay on completely (again, in the front or rear, whichever is not burnt out). In my case, I got the rapid blinking.
 Step 1: Pop trunk open.
Step 2: Remove butterfly plastic casings (3) from back of screws holding taillight in place from inside the trunk.
 The butterfly plastic casings look like this picture.
 You should end up with 3 completely removed when you're done.
 Step 3: You might hear a "click" or a "pop" when all 3 casings are loosened or removed. This means you can easily pull the taillight off from the outside of the trunk.
 Step 4: Being careful not to just let the taillight hang by the wiring as you remove it, pull gently back towards yourself.
 Step 5: Turn taillight to rest on the bumper or a tall stool so you can work (don't worry; there should be plenty of wiring available to stretch this small distance for you to do it. Just be sure you don't pull it taught).
 Step 6: The blinker bulb is the one near the base of the taillight, and is in a rather bulky connector. turn it gently counter clockwise so it loosens from the taillight casing.
 Step 7: Once you've loosened the bulb's casing, pull gently straight out. This is what you should see.
 Step 8: To remove old light blub, grip the black part of the bottom of the bulb (not the bulb itself; it can break and cut you!), and remove from the gray connector.

Step 9: Replace new bulb, being careful to put it in the same way the old one was contained.
 Step 10: Gently replace bulb casing back into taillight.
 Step 11: Gently turn bulb casing clockwise until it is secured back in place.
 Step 12: Align 3 screws on back of taillight into the 3 holes in the trunk.
Step 13: Gently push in until the taillight is situated properly with all 3 screws in the correct holes. Replace the butterfly casings on all 3 from the inside of the trunk.


That's my DIY tip for the day! I hope this might help some people who have new-ish cars like mine. I have no idea if they are all identical, but at least someone with a 2006 Ford Focus ZX4 can be helped by this post! :)

Thursday, May 17, 2012

Living out Ephesians 5:33

"Nevertheless, each individual among you also is to love his own wife even as himself, and the wife must see to it that she respects her husband." (Eph. 5:33 NASB)


A little over a year ago, I was 6 months into my "underemployment." I had lost a full-time job (which, to be truthful, was a bad idea for us in the first place), and found myself babysitting about 10-20 hours per week, and (during tax season, January-April 15th), I was getting about 15-20 hours a week working at H&R Block, just as I do every year. 


While we had an abundance to keep us afloat - physically, financially and otherwise, we endured a great financial loss during 2011, after having lost my job in October 2010, as my income was previously our primary income. 


However, I will say that after I lost my job, my wonderful husband really stepped up to the plate in so many ways! In addition to his regular shifts, he volunteered for twice as many, as well as staying late and covering for other people. Because I was pretty numb for about a week, he even took over a lot of my responsibilities around the house. The ones he couldn't get to or didn't feel like he could do, he assured me not to worry about it, and just let it go until I felt up to dealing with it. 


Trust me when I say that we were both in a state of shock. But it helped so much that I could just take a week, relax, not worry about the house and just focus on the rest I needed. 


Anyway, after that week, I snapped out of it. I figured out how to maximize my time at home. I looked for full-time work, but couldn't find anything. I was "over-qualified" for everything. 


So, we change our perspective. We embraced the circumstance we were in. I found resources to help us make the most of the limited income we had, and one of the ways I did that was by making our own laundry soap. 


I used the Duggar's Recipe to make it, and I made sure to buy an extra Rotary Cheese Grater from Value Village, so I didn't ruin the one we use for food. (The one pictured is very similar to the one I got for $1.99, and is still fairly inexpensive). 


  So, after I made it, Robert wasn't completely sold on it. He was a little leery, and I wouldn't expect any less, as I was very particular about the laundry soap I used to use. (We used to use Gain Apple Mango Tango). Additionally, I used a particular fabric softener. (Downy Vanilla Lavender). 


Below is a picture of the board I use to keep track of our laundry expenses, and have had since we started making our own laundry soap: 


On the far left, I initially started keeping track of how much homemade laundry detergent saved us (monetarily). On the right, I used a tally to keep track of how much I could stretch our fabric softener for our dollar. I bought it last May, and it advertises 167 "medium-sized" loads. I didn't believe it, since I used to use about 1/2 a capful of softener with our old detergent. I didn't think there was any way to make it last through 167 loads.


But now that we make our own (less-sudsy) laundry soap, I use far less softener. (Fabric softener reduces the amount of suds in the wash, so a less-sudsy detergent will keep the softener usage low). I never could have guessed just how much this would save us in the long-run. As you can see, the tally for the softener on the right shows when I had used 167 loads, and how many more I've gotten out of the bottle since then - 84 loads more than 167!


One of my jurisdictions is laundry here at our house. Robert really doesn't do it unless I'm sick, or specifically ask - and he's always happy to help me with it! 


About a week before Ashley & I left for Wyoming (another blog post on this is forth-coming, I promise!), he saw me switching loads one evening. He watched me make a mark on the tally, and said, "So, what is this little chart for?" I explained, and he said, "Oh! So...really, you've used a whole lot less by now than you thought, right?" I said, "Yeah, and it's gone so much further and longer than I expected it would, too. See when I bought the softener?" He looked and then looked at me. It took him a minute, but then he said, "I'd say that is definitely worthwhile investment!" 


It made me feel SO good to hear my husband say that he was proud of my efforts, and affirm that I'm being a good steward of what we have. :) Love & respect - that's what it's all about.


Monday, May 14, 2012

Spring Cleaning Goals & Ambitions

Hi readers!

Sorry I've kept you all waiting so long for this post. We have been so busy these past couple of weeks, and I was out of town on a road trip to Wyoming from last Wednesday until last night.

Anyway, drumroll, please! I've got my list of Spring Cleaning Goals & Ambitions right here for you - to wrap up my Spring Cleaning Mastermind Notes series. :)

I've made changes and deletions, so I apologize in advance if you were looking for something specific I referenced in a previous blog in the series, because I did reconsider some of the things I was planning on doing for no other reason than to get away from disappointing myself. Have no expectations = have no disappointments. I'm taking a middle road because I have faith that God will provide me with the tools and energy I need to do everything. 

Goals:
Get the guestroom in order (get rid of old books, unwanted items, etc.)
Get the shelves in the office cleared off and re-organized the way we want them
Get rid of the old TV in the family room
Make a meal plan every week, stick to it
Get back on top of coupons
Go through clothes, get rid of at least 20 items
Get back into using my day planner
Clean the bathrooms twice a month
Eliminate Hot-Spots

Clean the vinyl floors once a week (with the wonderful Swiffer tool I have pictured above!)


Ambitions:
Keep the garden (in pots & planter boxes) going and blooming well, use what we grow
Plan how to re-do the guest bathroom, price it out (we're doing Americana)

(I like this shower curtain, but it's not exactly what I want.
)
Read 4 books before July
Make sure I know what my monthly goals are, post them, stick to all of them
Get back into the year-long chronological bible
Stretch our savings plan $20 more each week (i.e., put away $20 more than we are)
Get new throw pillows for the couch and seat cushions for the dining room (or make them)
Get into textiles for my shop
Get a new journal where I can sketch and keep track of my daydreams (especially for my shop)
(I like this one!) 


That's it!! I hope you

Tuesday, May 1, 2012

Centerpiece pics and plates

 As promised, here are a few pictures of my new centerpiece. :)


They include the new plates I got on the left, as well as the awesome new eggplant-colored platter I got from my MIL this weekend! Yay!


Anyway, if you come over for lunch or tea/ coffee, this is what you'll see! :)